While taking a shower, do you think: “I wish there were tile corner shelves in this shower.” We got you covered with our weekend projects articles. We’ll explain the steps and processes for building your own tile shower shelves.
On a skill level from 1 to 5 (5 being the highest), this is probably a 3. With familiarity and understanding of power tools, this job is pretty simple, yet not the cleanest. If you do a little prep work, completing the tile shower shelves should take about 90 minutes.
[adsenseyu1]
Tools Used
-

DeWalt DCV581H Vacuum
- DeWalt AC/DC DCV581H Vacuum
- 4.5” Tile/Masonry Blade
- Pencil
- Stone/Tile Sanding Block
- Sponge
- Bucket
Supplies
- Eye Protection
- Dust Mask
- Thinset (optional)
- Grout
- Tile (12” x 24” piece)
- String (~18” long)
- Marker (not dry-erase)
Related Read: Learn How to Build a Cordless Band Saw Stand
Jist of the Job

What we’re doing is installing tile shower shelves in an existing shower with tile walls. We’ll be cutting a single tile into two quarter-round shelves. These will be installed inline with the tile grout lines, and grouted around the new shelves. Then cleanup is all thats left to enjoy your new tiles shower shelves.
Preparing for the Tile Shower Shelves
As mentioned prior, this job can get a little dirty…plenty of dust. It’s heavily recommended to have a shop vac or dust extractor nearby, in addition to your dust mask and eye protection. Even though we’re not to the grouting stage yet, go ahead and fill your bucket with clean water, and throw the sponge in. This will help with cleanup along the way.
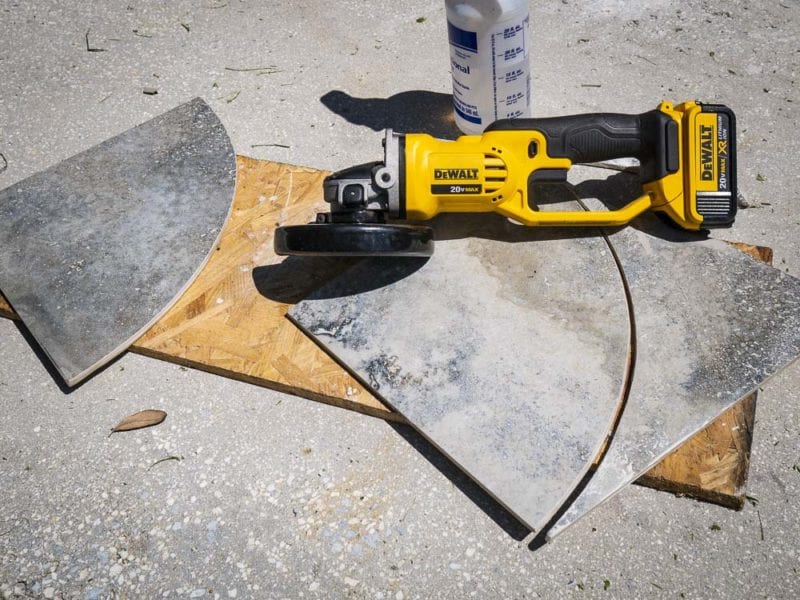
Step 1 – Making the Tile Shower Shelves

DeWalt DCG412B Grinder
Using the DeWalt cordless grinder and the 4.5” tile blade, we need to cut shelves first. We used a single 12×24 tile, so we made the shelves 11.5” deep (radius). Tie a loop in one end of the string and attach it to the marker. Measure on the string (taught) from the marker, out to 11.5” and make a mark on the string. [You have a marker in your hand, use that.] Use your thumb or forefinger to hold the string (at the mark) on one corner of the tile. With the other hand, use the marker, with the string taught, start at one edge of the tile, drawing an arch to the other edge.
No need to have a tile wet saw on this project, you can make quick work of this with the grinder. Using the grinder, carefully score the tile along the line, don’t cut too deep, all the way across the tile, from edge to edge. The next passes, you can make deeper cuts, as you now have a channel for the blade to follow. Be carefull not to cut too deep on a single pass, you can break the tile. This should be done outside, and you can add some water to the cutting process to keep down the dust.
You’re not done yet. To make installation much easier, relief cut the back corner of the new tile shower shelves. Since our 4.5” round tile blade and grinder won’t reach into the deepest corner of the existing shower, we’ll chop of the back corner to make things easier. Once installed, it will hardly be noticeable and the open corner will allow for the water to flow down the vertical corner of the shower.
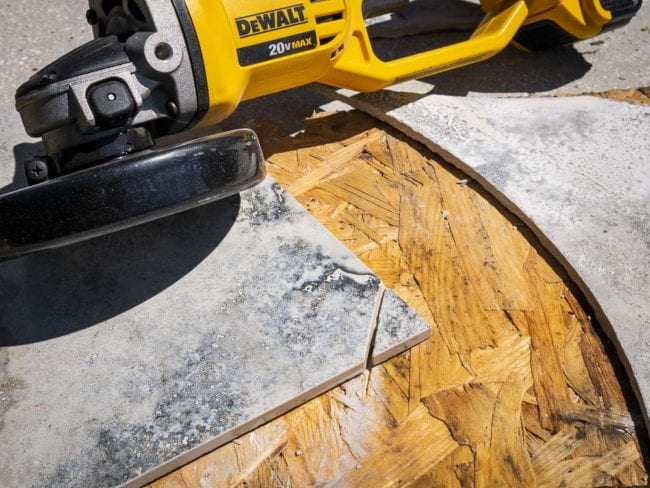
Cut off the tip of the new tile shelf.
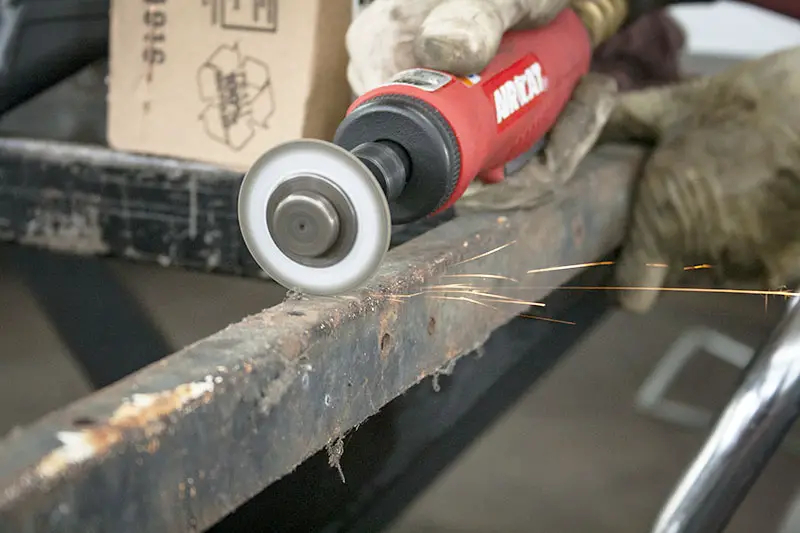
Step 2 – Grout Grinding
Now, the work moves inside the shower, so it’s recommended to have a dust mask and a vacuum or dust extractor. Measure from the corner of the shower corner, out 12-inches and make a mark on the wall. Do the same on the adjoining wall, right above the grout line.
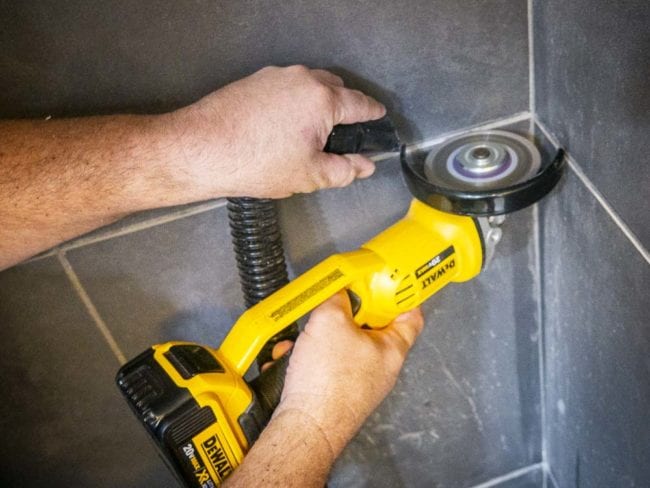
Removing Existing Grout
With the grinder, carefully remove the grout from the grout-line. We use the DeWalt AC/DC vacuum to catch most of our dust, hence holding the vacuum hose just behind the blade. Start on the bottom of the grout-line, removing the material right along the top of the tile below. The blade will almost naturally follow the top of the tile. You don’t need to cut too deep, only about 1/4” on each side. There’s no need to cut all the way to the wall or thinset. Carefully, work your way up, removing the grout up to the next tile.
Depending on the thickness of your tile shower shelves, you will probably need to cut into the existing tile, above the grout. Before cutting into the tile, after removing the grout, place one of the tile shelves in place. You should be able to put the bottom of the tile shelf on the top ridge of the lower tile. This will allow you to mark a top line, hence provide a reference line for cutting the existing tile. Continue to cut your way up to your needed thickness.
[adsenseyu2]
Step 3 – Test Fit
Test Fitting Shelves
Ensure that the new tile shelves fit in place. Make any corrections to ensure a proper fit. As long as 3/16” to 1/4” of the shelf overlaps the existing wall, your shelves should be plenty strong.
Step 4 – Install Tile Shelves and Grout
With the shelves removed, vacuum and clean out the old grout lines where the shelves will go. If you choose, you can mix up some thinset to use behind the shelf edges, in the wall. We felt comfortable just using grout for permanently fastening the new tile shower shelves. Properly mix a few handfuls of grout in a bucket. Using a trowel, float, or your fingers, spread some of the mixed grout into the existing voids where the shelves install. Don’t over-fill, as you want the shelf to fit snug in the area and push out any extra grout.
Put the shelf in place, then tap it further in, with your palm or a small rubber hammer. Ensure the shelf makes a snug fit and doesn’t risk falling. With the shelf in place, grout around every edge, above and below. Use plenty of grout, even creating a bevel of grout between the wall and new shelf.

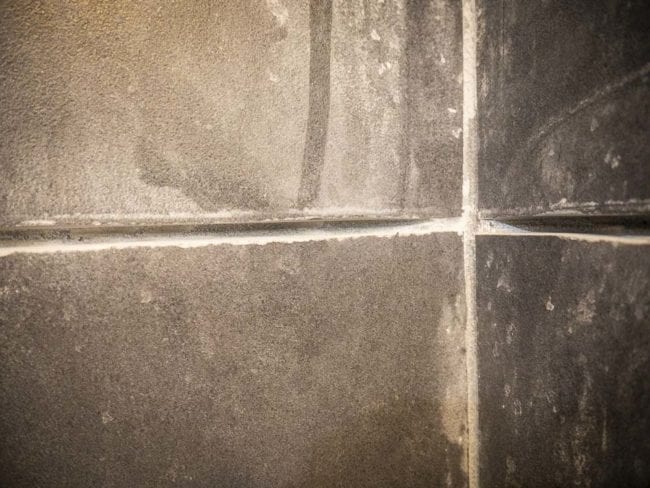
Step 5 – Cleanup

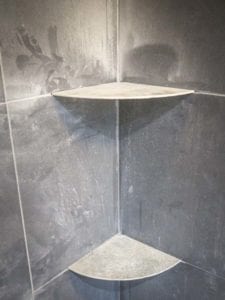
Finished Tile Shower Shelves
Give the grout a chance to cure for 30-minutes or so, then clean-up with a wet sponge. Fill a bucket 1/3-full with clean water. Using a damp sponge, remove any excess grout from the walls and new tile shower shelves. The wet sponge can also be used to perfect the bevel of the grout and blending new grout with the existing.
Let everything dry for 24-hours. You can buff any residual with a towel or wet sponge again. Your new tile shower shelves are ready for soap, shampoo, and conditioner.


Leave a Reply