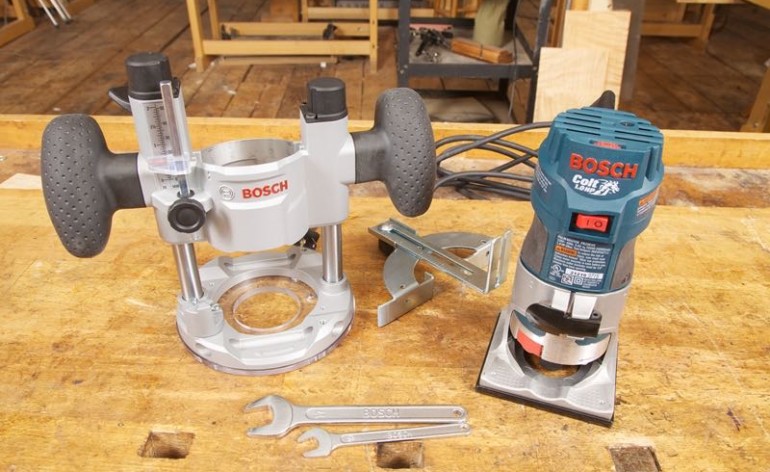
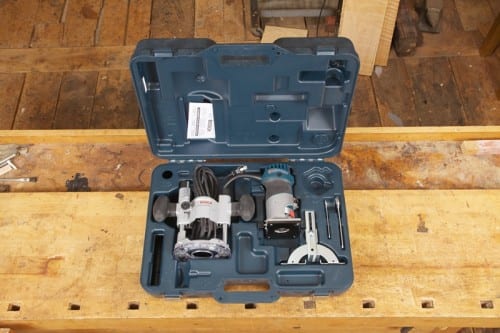
This month I had the privilege of testing an interesting new palm router kit from Bosh. As usual, Bosh assigns a descriptive model number to the tool: PR20EVSPK. This stands for Palm Router 20 Electronic Variable Speed for the tool. The PK is for kitting it with a fence and a plunge base that converts it to a plunge router. Switching the motor between bases and all height adjustments are quick, tool-less operations. The Bosch Colt Palm Router has a spindle lock but is also supplied with two forged wrenches. The second wrench is useful when a bit has been over torqued or hasn’t strayed from the collet since the last ice age. You can be hard put to lock the spindle with a thumb button at times.
[adsenseyu1]
Bosch Colt Palm Router Combo Kit Features
Although Bosch only assigns a number to the tool on the box and in the instruction manual, a Colt 1.0 HP logo with a horse icon is prominent on the motor. I don’t know about you, but I remember names, not numbers. Even Intel started using names for their processors, albeit because they could trademark them, but regardless, I can remember “Obsolete Tomorrow” better than “386”. I will therefore refer to the tool as Colt throughout the rest of this article.
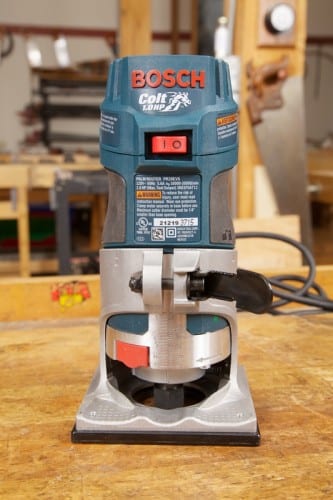
Woodworkers have long liked flush trim routers for all kinds of free hand routing. Bosch’s main design concept for the Colt was to build a flush trim router with 1 hp. They call it a palm router to distinguish it from its low powered progenitors. I really appreciated the ergonomic rubber grip on the motor and the 10’ long neoprene sheaved SJ-type power cord on this double insulated tool. SJ cord is tough and always pliable, even in cold conditions. The cord sports an angled reinforcement boot where it enters the tool that keeps it up and out of the way during routing. The Bosch Colt Palm Router Combo Kit is soft start, and its speed can be dialed anywhere between 16,000 and 35,000 rpm in 6 increments. Bosch’s Constant Response circuitry quickly senses the load and corrects the power input to keep speed more constant.
In all of my use tests, the Colt’s brush-type universal motor had plenty of power—more than enough for ¼” shank bits of 1-5/16” maximum diameter for which it is designed. It’s this robust power that makes the Bosch Colt Palm Router a workhorse in a host of everyday woodworking applications. The second plunge base expands this horizon even further. In many handheld situations a small light router is far better than a 3 HP behemoth. The small size and lightweight body allow it to be more dynamic, giving a better sense of feel, whether it be following an edge with a pilot bearing/fence, or following a template with a guide bushing. I found it great for plowing grooves, chamfering, profiling edges and inletting hinges.
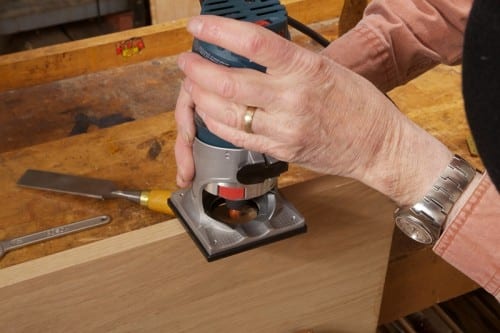
I tended to use the fixed base more than the plunge base because of its diminutive size and good visibility of the milling taking place. I am more comfortable with a fixed base router in general because that is what I learned with many years ago. As stated earlier, my work is mostly one-offs, and the fixed base is better for freehand work. The plunge base works splendidly and is what I would reach for in production situations where I needed to make serial cuts or needed very precise bit depth.
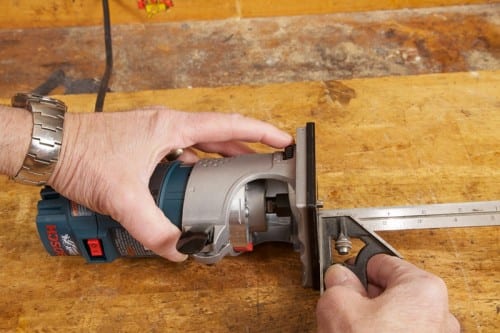
The Colt was supplied with a fence that fits quickly to the back of the fixed base. It worked well, allowing cuts up to about 3-½” from an edge. It facilitates the attachment of wood runners, which makes for better support and better sliding along an edge but reduces edge distance. A fence is often handy even with bits that have a pilot bearing, as starting and exiting at the corners is sure with no rounding. Sadly, the fence will not fit the plunge base which requires the Deluxe Edge Guide with Vacuum Adapter (RA1054). This $40 accessory is a good, highly adjustable fence with plastic facing on the runners that also sports a vacuum port for dust extraction.
Depth adjustment of the fixed base was nothing short of sweet. Unlocking a toggle on the front of the fixed base and turning the motor about ⅛” counterclockwise allows coarse adjustment. The motor now slides easily up or down. Turn the motor back clockwise the ⅛”, and you are in fine adjustment mode. Turn the fine adjusting nut counterclockwise to raise the bit and clockwise to lower it. Clockwise, like the dial on an old radio, is more, and counterclockwise is less. Snap the toggle back, and everything is locked solid. I appreciated that there is both an inch and a millimeter scale as I sometimes work in metric.
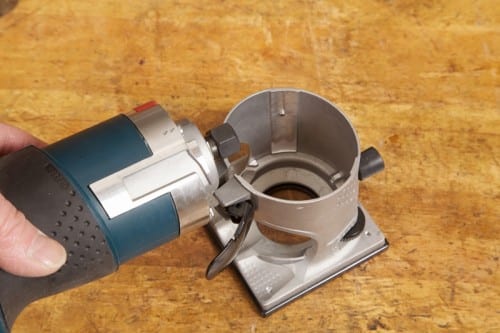
Getting in and out of the Fixed and Plunge Bases
To remove the motor from the fixed base, you perform the ⅛” unlock and pull upward until you feel resistance. You then turn the motor further counterclockwise while pulling up, and the motor is free of the base. Putting the motor in the plunge base is the reverse of this operation. Simply line things up, turn clockwise and let the motor drop down as far as it will go. Be sure to lock the base clamp lever on the back. Height adjustment is independent of the clamp lever and is controlled by the plunge mechanism. Actuating a spring loaded locking lever at the back of the left riser tube with your thumb allows rapid height adjustment. A rod that can be locked at any height achieves precise stopping. Finally, an adjustable hairline scale on the rod makes depth setting ultra precise. As with the fixed base, there are both inch and metric scales. A turret stop on the router base allows progressive cuts.
I think the reason for the pristine condition of all sorts of 19th Century precision instruments is that they were all supplied in sturdy wood cases. Therefore, I appreciated the commodious plastic case supplied with this kit. It has a place for everything that comes with the tool plus most of the other optional accouterments. This corral should keep the Colt pristine and frisky for future generations.
Today, all power tool instruction manuals have a liturgy of proscribed practices written by liability lawyers. After the usual preamble of “don’ts”, the Colt’s instruction manual becomes very informative with good illustrations and decent advice for real life situations. On a scale of 1 to 10, I would give it an 8.
I found it bothersome that neither the fixed nor the plunge base accepted guide bushings as delivered. Guide bushings require swapping the standard base plate for either the PR009 base plate, which accepts Bosch bayonet type guide bushings, or the PR010 base plate, which accepts threaded Porter Cable type guide bushings. Either base plate will fit either the fixed or the plunge base. The PR009 also requires the RA1100 bayonet ring. The bayonet ring and 7 guide bushings sell for under $40. The PR010 base is about $10.
Bosch offers their own very good line of quick-changing bushings, but a substantial part of the woodworking community is hooked on the threaded Porter Cable type bushing. I can understand then that relegating the Bosch or PC guide bushing decision to an aftermarket purchase is probably wise marketing. If you have a gaggle of threaded PC bushings, you are not forced to buy Bosch as well.
My only real disappointment with the Colt is that dust collection is not standard, and I would like to see this feature added as standard to future models. I recommend this router highly. The Bosch Colt PR20EVSPK Kit sells at a street price of about $190.
[adsenseyu2]
Optional Accessories
- Roller/Bushing Guide (PR003): This attaches to the same slot used to attach the fence at back of fixed base. This accessory positions a guide roller below bits that lack a pilot bearing. Cost: $15
- Offset Base (PR004): This is mostly used in laminate or veneer work this is an entirely new fixed base with an arbor that lies in a bump out outside the router. The arbor is driven through gears and requires replacing the collet with a drive gear. It allows working into tight corners. Cost: $55
- Tilt Base (PR005): Here is another fixed base that allows tilting the Colt backward. Used mostly by installers to trim backsplash but could be useful in veneer work. Cost: $35
- Under Scribe Attachment (PR006): This allows for laying two sheets of laminate or veneer on top of each other. Bottom sheet needs a straight (jointed) edge. Cuts second sheet to perfectly match the first. Good for jointing large sheets. It can also be used with vacuum dust collection base PR007. Cost: $20
- Side-Handle Sub-Base (PR007): This is an oval base that ads dust collection and a outboard knob to better control router during any edge operation such as flush trim or profiling. Cost: $30
- Base Cover (PR008): This is a rubber cover for the fixed base (or tilt base) that provides insulation from tool heat and vibration in high use applications. Cost: $8
- Edge Forming Dust Extraction Hood RA1175: This provides dust collection for the plunge base. This accessory (plus a tool triggered vacuum) is a must-have if you do a lot of laminate or veneer work. Cost: $15


Leave a Reply